

Step 01
Roll the Frames Into Position
Use the built-in urethane wheels to move each QuickJack frame across the floor and into position alongside the vehicle.
Once the initial setup is complete, using QuickJack is straightforward. Roll the frames into position, place them correctly beneath the vehicle, connect the hydraulic system and power unit, then use the hand-held pendant control to raise the vehicle.
Always use the correct QuickJack model for your vehicle, follow the lifting-point requirements in your vehicle manufacturer's instructions, position the lifting blocks correctly and verify that both mechanical locks are fully engaged before working beneath a raised vehicle.
Once your QuickJack has completed its initial setup, getting ready for your next project becomes a simple repeatable process.
Use the built-in urethane wheels to move each QuickJack frame across the floor and into position alongside the vehicle.

Slide both QuickJack frames beneath the vehicle on an appropriate stable surface. Position the frames parallel to one another with both lock bars facing outward and align the lifting blocks with the vehicle's designated lifting points.
Why the Frames Must Stay Parallel
Connect the power unit and QuickJack frames using the hydraulic hoses and quick-connect fittings. Confirm that each connection is fully seated before operating the lift.
Disconnecting and Reconnecting Hoses
Connect your QuickJack power unit to the appropriate power source for that specific power unit. Verify that your power source matches the requirements of your QuickJack system before operation.

Use the pendant control to raise the frames to the desired locking position. Follow the operating procedure for your QuickJack model to lower the frames onto the mechanical locks, then verify that both frames are securely locked before beginning work.
Correct frame orientation is an important part of operating QuickJack properly.
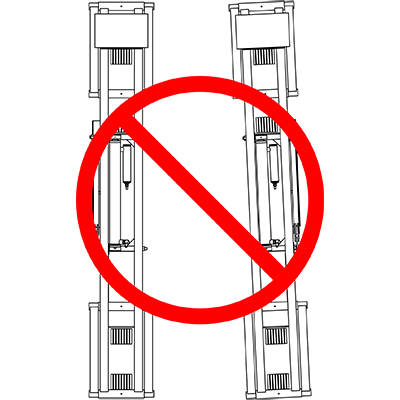
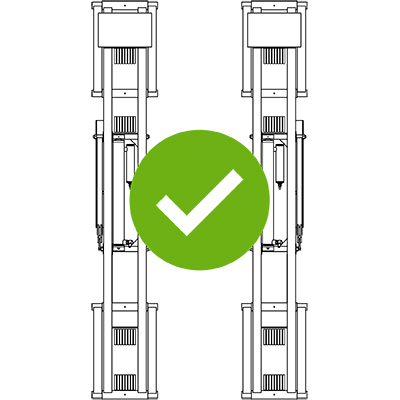
QuickJack uses a folding parallelogram frame design. As the frames rise, they also move through a slight horizontal arc. When both frames are properly positioned parallel to one another, they move together as the vehicle rises.
The lifting blocks must remain properly positioned at the vehicle's designated lifting points throughout the lifting process. Because vehicle lifting-point layouts vary, not every vehicle configuration is compatible with every QuickJack frame.
Confirm vehicle compatibility and lifting-point requirements before use. If you're unsure whether your vehicle can be properly positioned on QuickJack, contact QuickJack before attempting to lift it.
When permitted by the instructions for your QuickJack model, the hydraulic hoses can be disconnected after the vehicle is properly supported on the mechanical locks. Depressurizing the system first makes the quick-connect fittings easier to disconnect and reconnect.
Follow the QuickJack operating instructions to release residual hydraulic pressure before attempting to separate the quick-connect fittings. Removing pressure from the lines makes the fittings much easier to reconnect later.
Align the quick-connect fitting correctly when separating or reconnecting the hoses. When the hydraulic pressure has been properly relieved, the fittings should reconnect without excessive force.
If your setup and model instructions allow it, leaving the long hydraulic hoses connected to the power unit can simplify storage and reduce unnecessary connecting and disconnecting. Coil the hoses neatly near the power unit and protect the fittings from dirt or damage.